I’ll never forget the sickening sound of shattering glass as I took a sharp turn on my first RV trip.
When I finally pulled over and opened the cabinet, I found my favorite dinner plates in pieces, scattered across the shelf.
If you’ve experienced this gut-wrenching moment, you know exactly why learning how to keep dishes from sliding in RV cabinets isn’t just about organization; it’s about protecting your investment and your sanity.
Over the years, I’ve tested countless methods to secure my dishes, from simple five-dollar fixes to complete cabinet overhauls.
In this guide, I’ll share everything I’ve learned about preventing broken dishes, organized from the easiest solutions to the advanced setups.
But before we dive into securing methods, remember that choosing the right dishes makes a huge difference.
Check out our guide on the best RV dinnerware sets to start with dishes designed for travel.
Why Dishes Slide and Break in RVs: Understanding the Problem
Road Vibration Creates Constant Movement
Even when you’re cruising down smooth highways, your RV experiences constant micro-vibrations. Every bump, turn, brake, and acceleration creates movement inside your cabinets.
I used to think my careful driving would prevent damage, but I learned that physics doesn’t care how gentle you are with the gas pedal.
The cumulative effect of hours on the road means dishes gradually inch their way across shelves, building momentum until they crash into each other or the cabinet walls.
Cabinet Design Issues Work Against You
Here’s something that frustrated me for months: RV manufacturers design cabinets with latches that keep doors closed, but they do absolutely nothing to secure what’s inside.
Those shallow shelves look great in showroom photos, but they provide minimal stability for stacked dishes. The cabinet itself becomes a box where everything can shift freely during travel.
The Physics of Shifting Items
Weight distribution plays a bigger role than I initially realized. Heavier ceramic dishes slide with more force than lightweight options, creating more damage when they hit something.
Smooth cabinet surfaces combined with smooth dish bottoms create the perfect sliding conditions.
After my third broken plate, I finally understood that standard home organization methods simply don’t work in a moving vehicle.
Common Breaking Points
Most of my dish casualties happened in predictable ways. Opening cabinets after travel and having dishes tumble out taught me about forward momentum.
Glassware clinking against each other during turns created chips and cracks. Plates sliding into cabinet walls at every stop sign eventually shattered even “durable” options. And cups that seemed stable would somehow fall when I opened doors, even carefully.
Now that you understand why it happens, let me share the solutions I’ve tested over the years of RV travel, organized from easiest to most effective.
Foundation Solutions: Start Here First
Non-Slip Shelf Liners: Your First Line of Defense
Installing proper shelf liners made a significant difference for me. I’m not talking about those smooth plastic liners you might use at home; you need textured, grippy liners that actually hold dishes in place.
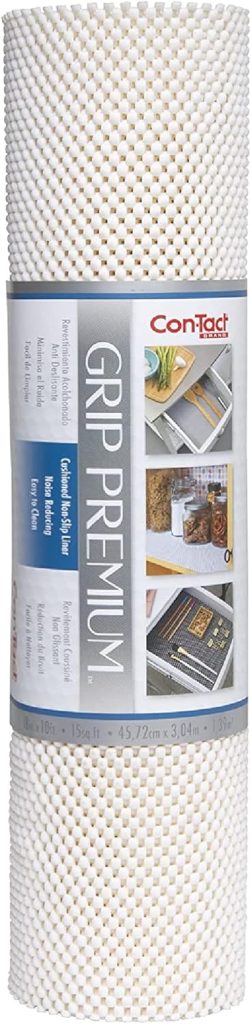
After wasting money on cheap options, I discovered that brands like Duck Brand, Gorilla Grip, and Con-Tact make liners with an aggressive texture that genuinely work.
Here’s how to install them properly: Measure your cabinet shelves carefully, cut the liner to fit exactly (no overlapping edges that create bumps), and lay it completely flat without any bubbles or wrinkles.
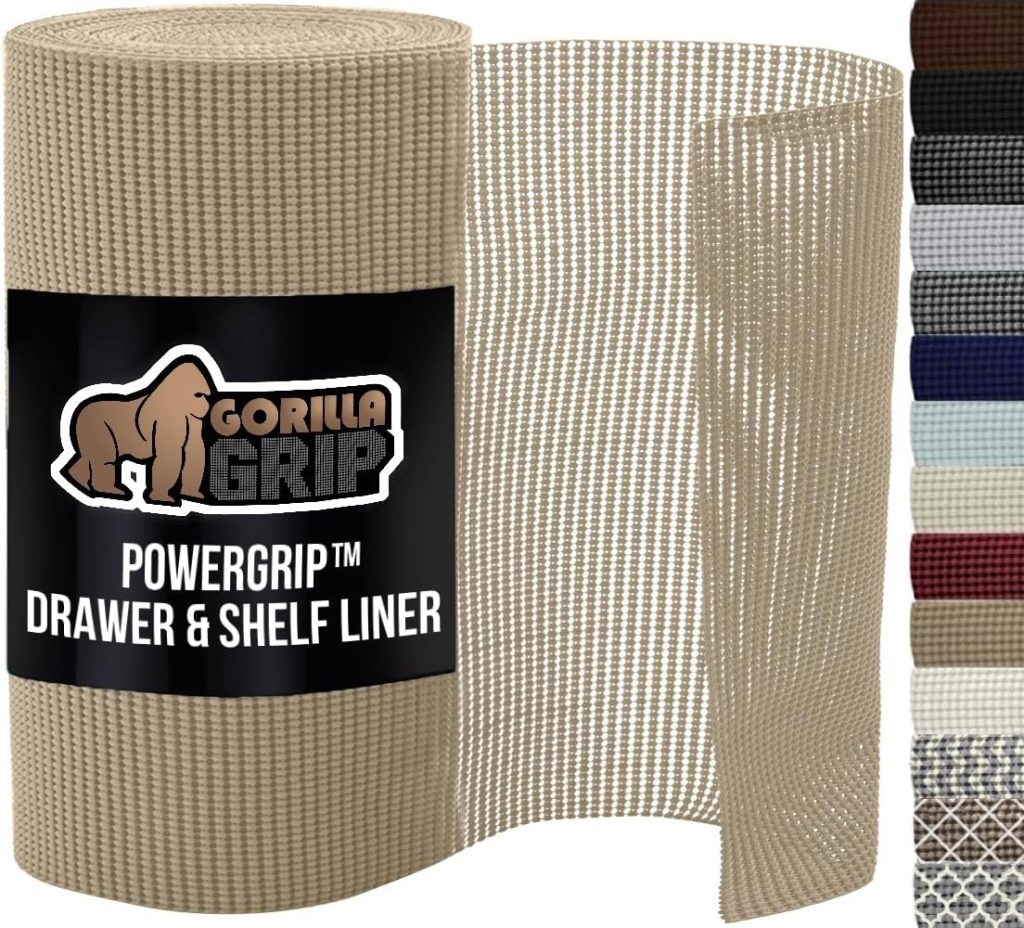
I replace mine every 18 months because they lose grip over time, especially in hot climates where they can become compressed.
This single change reduced my dish sliding by about 60-70%. It’s not a complete solution on its own, but it’s absolutely non-negotiable as your foundation.
The Strategic Stacking Method
I used to stack plates eight high, thinking I was maximizing space. After breaking half of them on a bumpy road, I learned that shorter stacks are exponentially more stable.
Now I never stack more than four to five plates together, and I haven’t had a stacking-related break since.
For bowls, nest them completely inside each other. This is one area where you can go higher because nested bowls act as a single stable unit.
When it comes to how to store cups in RV cabinets, I either nest them inside each other (if they’re the same size) or store them upside down. Never store cups loose and upright; they’ll tip over every single time.
Weight matters more than I expected. Always put your heaviest items on the bottom shelf. Your dinner plates belong below your salad plates, and serving bowls go lower than cereal bowls.
This isn’t just about stability; it’s about safety when opening cabinets.
Fill Every Single Gap
Empty space is your enemy. I learned this after watching a perfectly stacked set of bowls slide six inches sideways because nothing was stopping them.
Now, immediately after stacking my dishes, I stuff every gap with dish towels, cloth napkins, oven mitts, or silicone trivets.
Think about how to pack dishes in a motorhome like you’re preparing a shipping box. Nothing should wiggle when you gently shake the cabinet.
This technique serves double duty: it prevents lateral movement AND creates natural cushioning if items do shift. The soft materials absorb impact that would otherwise crack plates.
I keep a dedicated bag of kitchen towels just for this purpose. Before every trip, I redistribute them throughout my cabinets, filling any gaps that have opened up since the last time.
Step-by-Step Quick Start
If you’re new to RV dish securing, start with these four steps today:
- Install textured non-slip liners in every cabinet where you store dishes
- Reorganize your stacks to no more than 4-5 items each
- Fill every visible gap with soft kitchen items
- Do a gentle shake test. If anything moves, add more padding
This foundation setup takes about 30 minutes and will immediately improve your situation. Once you’ve mastered this, you’re ready for the next level.
Intermediate Solutions: Adding Structure and Control
Tension-Mount Dish Organizers
These spring-loaded bars transformed my most problematic cabinet. Brands like Camco Stabilizer Bar and Adjust-A-Bar use tension to stay in place without drilling or permanent installation.
You simply measure your cabinet width, twist the rod to expand it, and position it just above your dish stacks.
I have three of these installed in my RV, and they’ve saved countless dishes by creating a physical barrier that prevents stacks from tipping forward.
When I hit the brakes, the dishes press against the rod instead of tumbling.
This is particularly effective for how to keep things from falling out of RV cabinets. The rod catches anything that tries to shift toward the door.
Installation took me about five minutes per cabinet once I got the hang of it. The key is positioning the rod at exactly the right height: just barely touching the top of your tallest stack when the cabinet is full.
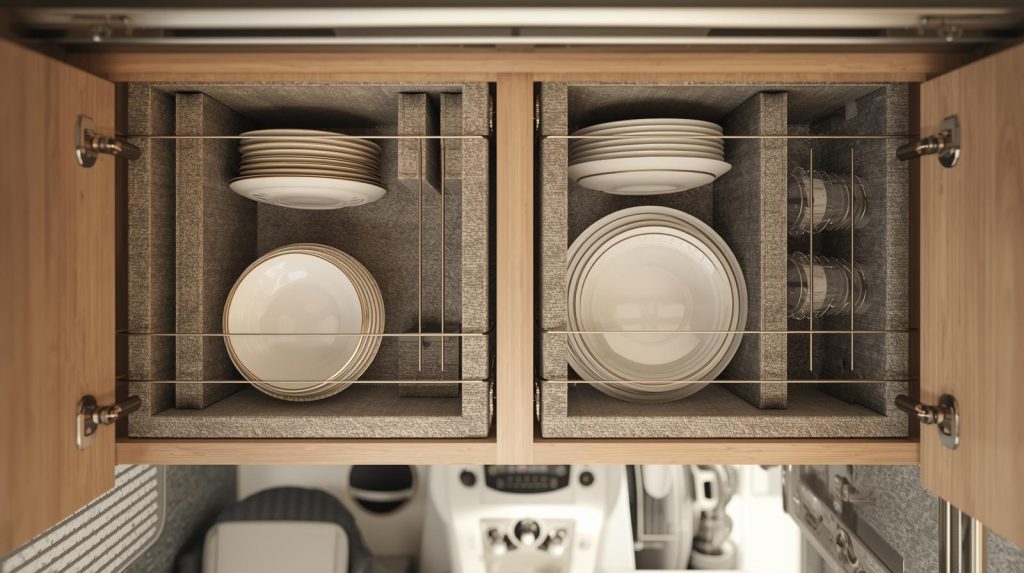
Plate Cradles and Vertical Storage

Switching to vertical plate storage was a game-changer for my dinner plates. Instead of stacking plates horizontally on top of each other, vertical storage systems like SimpleHouseware, mDesign, and Lynk Professional let you store plates upright like files in a filing cabinet.
This eliminates the stability problems of tall stacks. Each plate has its own slot, separated from the others, which means they can’t build momentum and crash into each other.
When I’m driving, the plates stay perfectly vertical and stable.
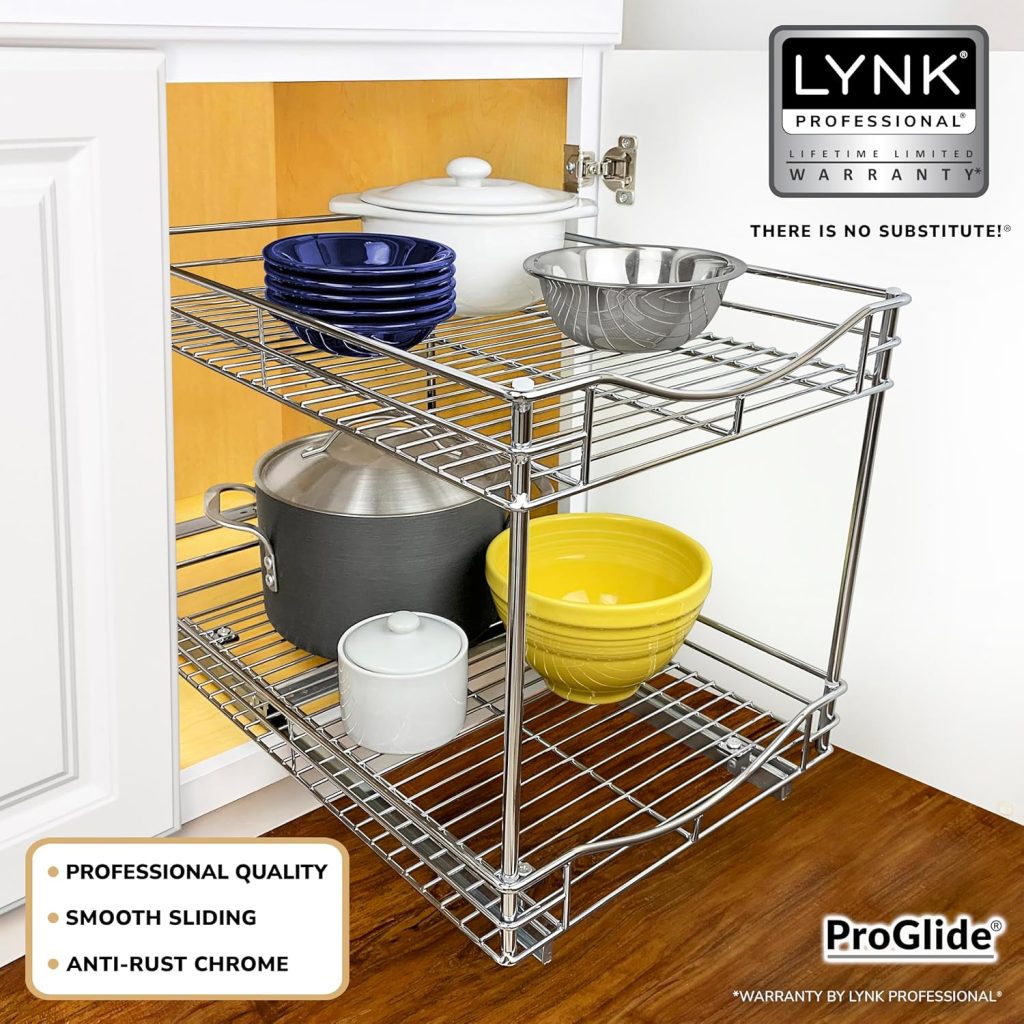
For how to secure glassware in RV cabinets, vertical cradles prevent the plate-on-plate contact that causes most chips and cracks.
I wish I’d discovered this method two years earlier; it would have saved me so much money and frustration.
The installation is simple: place the rack in your cabinet and load plates into the slots. Some models are adjustable for different plate sizes, which I found essential since I have both dinner plates and salad plates.
Adjustable Shelf Dividers
Spring-loaded dividers from brands like Lynk and Seville Classics let you create custom compartments for different dish sizes.
These work on the same tension principle as the dish organizers, but they’re positioned vertically to prevent sideways sliding.
I use these primarily for bowls and smaller items that tend to wander during travel. You compress the spring, position the divider where you want it, and release it to grip the top and bottom of your cabinet.
The divider creates a wall that stops items from shifting laterally.
One divider can section off a problem area and keep items contained. I have one separating my coffee mugs from my drinking glasses, and another creating a dedicated space for my serving bowls.
Foam Padding Between Dishes
For my more fragile items, especially my Corelle dishes, I cut thin foam sheets to place between each plate.
Brands like Duck Brand and Valtcan make foam shelf liner that’s perfect for this purpose.
I simply cut circles slightly smaller than my plate diameter and layer them between dishes.
The foam absorbs the impact of road vibrations and prevents that dangerous plate-on-plate contact. If you’re using tempered glass dinnerware like Corelle, foam padding is essential.
I learned more about protecting these specific dishes from our detailed guide on Corelle dinnerware for caravans, which covers material-specific care.
This method adds about an inch to your stack height, so factor that into your cabinet space planning. But the protection is worth the trade-off, especially for dishes you’d be heartbroken to lose.
Bungee Cord Cabinet Restraints
For oversized items that don’t fit standard organizers, I’ve had success with simple bungee cord systems.
I installed small adhesive hooks on the interior walls of one problematic cabinet, then stretched a bungee cord across my large serving bowls to hold them in place.
This solution is completely removable when I need access, and it’s infinitely adjustable for different items. It’s not pretty, but it works.
I use this method specifically for my oversized serving bowls that were too large for any commercial organizer I could find.
The key is using relatively light tension; you want just enough to prevent movement, not so much that you’re compressing your dishes.
Advanced Solutions: Maximum Security
Adding Extra Shelving
One of my best investments was adding a third shelf in my main dish cabinet. By installing an additional shelf bracket and board, I cut my stack heights in half, which dramatically improved stability.
Shorter stacks simply don’t tip as easily.
I measured carefully before cutting a piece of wire shelving to fit my cabinet dimensions. The installation required drilling into the cabinet walls to mount brackets, but it was straightforward even for someone with basic DIY skills like me.
Adding that shelf doubled my stable storage capacity and gave me dedicated spaces for different dish types.
If you’re intimidated by modifications, even a temporary wire shelf that sits on top of existing items can work, though it won’t be as stable as a mounted option.
Cabinet Door Reinforcement
Standard RV cabinet latches failed me more times than I can count. Even when properly closed, the doors would flex during travel, allowing the latch to pop open just enough for dishes to spill out.
After one memorable incident involving a bowl and my foot, I installed barrel bolts as secondary security.
Barrel bolts from Prime-Line or Shepherd Hardware are simple slide-bolt locks that add a second locking point.
I also tried child safety locks on a few cabinets, and they work surprisingly well for how to keep things from falling out of RV cabinets.
The installation takes about 15 minutes per cabinet—mark your position, drill pilot holes, and screw in the hardware.
Now I double-lock any cabinet with heavy or fragile items before travel, and I haven’t had an unexpected door opening since.
Custom Drawer Conversion
For my grandmother’s china that I refused to leave behind, I converted one cabinet into a pull-out drawer system.
This was definitely the most involved project, but for valuable or extremely fragile dishes, it’s the ultimate solution.
I lined the drawer with dense foam and created compartments for each piece. The dishes lie flat, fully supported, and experience minimal movement during travel.
Opening the drawer is smooth and controlled no risk of items tumbling out.
This wasn’t cheap or quick, but it gave me peace of mind about traveling with irreplaceable dishes. If you have heirloom pieces you absolutely must bring, this level of protection is worth considering.
Magnetic Solutions for Metal Dishes
This revolutionary approach only works if you have stainless steel dinnerware, but it eliminates stacking.
I installed adhesive-backed magnetic strips on the walls of one cabinet and attached my stainless steel plates directly to them.
The plates hang vertically against the magnetic strips, secured by magnetic force rather than any conventional organizer.
During travel, they stay exactly where I placed them, with zero movement. It’s like magic, honestly.
The limitation is obvious; this only works for ferrous metal dishes. But if you’re choosing new dinnerware and want the absolute easiest securing method, stainless steel with magnetic mounting is unbeatable.
Securing Items to Counters During Travel
Learning how to secure items to the counter in an RV expanded beyond just dishes for me.
I discovered museum putty brands like Quakehold and Scotch Mounting Putty, which is a reusable adhesive that holds items in place but removes cleanly.
I use this for everything on my counters: my decorative fruit bowl, coffee maker, paper towel holder, and even my small plants.
You press a small amount of putty onto the bottom of the item, press it firmly onto the counter, and it stays put during travel. When you want to move it, you simply lift and peel off the putty.
This stuff has been a revelation for me. Nothing shifts on my counters anymore, and I can still rearrange items whenever I want.
I keep a small container of fresh putty in my RV toolkit and refresh the putty every few months.
Material-Specific Securing Strategies
Securing Lightweight Plastic and Melamine
Lightweight dishes present their own challenges because they slide more easily than heavier options.
When I tested melamine dinnerware, I found it needed more aggressive non-slip solutions than my other dishes.
Multiple tension rods worked best for these lighter materials. I installed one above the stack and one in front, creating a corner brace effect.
Extra padding with kitchen towels also helped fill the gaps that lightweight dishes created.
The advantage of lighter dishes is that they cause less damage when they do shift, but the disadvantage is that they shift more frequently. You need to compensate with more secure points.
Protecting Corelle and Tempered Glass
My Corelle dishes are heavier than plastic but more fragile than ceramic, which creates an interesting securing challenge.
The weight actually provides some natural stability; heavier items don’t slide as easily as lightweight ones.
However, the fragility means foam padding becomes non-negotiable. I learned this after chipping the edge of a Corelle plate during my first trip with them.
Now I use foam sheets between every plate, and I strongly prefer vertical storage for my Corelle dinner plates.
The combination of foam padding and vertical storage has reduced my Corelle breakage to almost zero.
These dishes are remarkably durable for tempered glass, but they still need proper protection during travel.
Handling Stainless Steel Dishes
If I had stainless steel dishes, I’d use the magnetic mounting system I described earlier.
But even without magnets, stainless steel has advantages: it’s virtually indestructible, so you can be less precious about how you secure it.
The main issue I’ve heard from friends with stainless steel is noise. The metal clangs loudly during travel if the pieces touch each other.
Silicone bumpers or cloth padding between pieces solves this problem and makes for much more pleasant driving.
The slippery metal surface definitely needs textured shelf liners more so than any other material I’ve used.
Managing Enamelware and Ceramic
Traditional ceramic dishes are the heaviest option, and that weight cuts both ways.
On one hand, heavy items are naturally more stable and resist sliding.
On the other hand, when they do gain momentum, they hit harder and cause more damage.
I learned that ceramic belongs on the bottom shelf after a cracked plate incident. The lower position means shorter distances to fall if something goes wrong, and it helps with overall weight distribution in the RV.
Enamelware is similarly heavy and has the added risk of chipping where the enamel meets the steel core.
I treat it like ceramic bottom shelves, foam padding, and extra attention to securing.
The Pre-Travel Checklist: Essential Steps
I’ve developed a routine that I follow religiously before every trip, and it’s saved me countless broken dishes.
Before Every Trip:
First, I open each cabinet and gently shake the contents with my hand. Anything that moves more than a quarter inch needs immediate attention.
This five-minute check has prevented so many problems that I won’t skip it anymore—not after the one time I did and regretted it.
Second, I check all tension rods to ensure they haven’t loosened. The vibration from previous trips can gradually loosen these, and a loose rod is almost worse than no rod at all because it gives you false confidence.
Third, I verify that every cabinet latch engages fully. I don’t just close the door, I pull on it to make sure it’s actually latched.
This seems obvious, but you’d be surprised how often a latch looks closed but isn’t fully engaged.
Fourth, I fill any new gaps that have appeared since the last trip. Items naturally settle and shift between uses, creating spaces that weren’t there before. I walk through with my bag of dish towels and stuff any gaps I find.
Fifth, I secure or remove any counter items. Everything either gets museum putty or goes into storage. Nothing stays loose on counters during travel.
Finally, I do a visual weight check. If one cabinet looks significantly fuller than the others, I redistribute items to balance the load across multiple cabinets.
Seasonal Adjustments:
Twice a year, I adjust my entire system. In summer, heat causes materials to expand slightly, so I loosen tension rods just a touch to prevent them from becoming over-compressed.
In winter, everything contracts, so I tighten everything back up to compensate for the gaps that develop.
This seasonal adjustment makes a huge difference. I mark it on my calendar so I don’t forget.
After Long Drives:
When I arrive at a new location after a particularly long or bumpy drive, I inspect every cabinet for new damage or unexpected shifting patterns.
If I notice that one cabinet consistently has problems, I know it needs additional securing solutions.
I take notes on problem areas. My phone has a running note titled “RV Dish Issues” where I jot down which cabinets need attention. This helps me prioritize improvements during downtime.
My personal routine takes about 15 minutes before departure, and I walk through my RV touching every cabinet and listening for any rattles before I back out of any campsite.
It’s become such an automatic habit that I barely think about it anymore.
Complete System Examples: Putting It All Together
The Minimalist System (Weekend Warriors)
When I first started RVing and only took monthly weekend trips, I used a bare-bones system that took about 30 minutes to install:
- Textured non-slip liners in every cabinet
- One tension rod in each main dish cabinet
- Dish towels stuffed in all visible gaps
- Items stored no more than 4-5 high
This basic setup worked perfectly for short, infrequent trips. I didn’t have any breakage with this system during my first six months of weekend camping.
The key was consistency. I used it every single time, even for short trips.
The Balanced System (Regular Travelers)
After I started taking longer trips more frequently, I upgraded to what I call my balanced system. This is my current setup, and I haven’t broken a dish in over two years:
- High-quality textured non-slip liners throughout
- Tension rods in every dish cabinet (sometimes two per cabinet)
- Vertical plate cradles for all dinner plates
- Foam padding between my Corelle dishes
- Adjustable dividers create compartments for bowls
- Barrel bolts on my two most-used cabinets
- Museum putty on everything that sits on counters
This system took me about 2-3 hours to fully install, spread over a weekend. The upfront time investment paid off immediately.
I estimated I was spending 45 minutes before each trip reorganizing and re-securing dishes with my old method; now I spend maybe 10 minutes on a pre-trip check.
The Premium System (Full-Timers)
I have friends who live in their RV full-time, and they’ve built what I consider the ultimate dish-securing system. If I ever transition to full-time RV living, this is what I’ll do:
- Professional-grade grippy liners in every cabinet
- Multiple tension rods per cabinet, creating a grid-like support
- Vertical plate cradles throughout for all plates
- Extra shelving added to reduce stack heights
- Barrel bolts on every single cabinet door
- One custom drawer conversion for heirloom dishes
- Foam padding for all glass and ceramic items
- The museum putty on absolutely everything on counters and shelves
This premium setup takes a full weekend to install properly and requires some cabinet modifications. But for daily life on the road, it provides complete peace of mind.
My full-timer friends tell me they never worry about dishes anymore; everything is so secure that they barely think about it.
Mix and Match Based On
Your system should match your reality. Consider how often you travel; weekend warriors don’t need full-timer solutions.
Think about your cabinet configuration; some RVs have deep cabinets that need different solutions than shallow ones.
Consider what dishes you actually have. If you took our advice and chose the right RV dinnerware sets, you’re already starting with travel-appropriate dishes.
And finally, be honest about your priorities. If you’re willing to risk some breakage to keep things simple, the minimalist approach works.
If broken dishes cause you genuine stress, invest in the balanced or premium systems.
Common Mistakes I’ve Made (So You Don’t Have To)
Over-Stacking Dishes
I used to think I could safely stack eight plates together. I was completely wrong. On a particularly rough stretch of highway, that tall stack tipped over, and three plates shattered.
The physics are simple: taller stacks have higher centers of gravity and tip exponentially more easily than short stacks.
Now I never exceed four to five plates in a stack, and I haven’t had a stacking-related break since.
Yes, this means I needed to add shelving and use vertical storage to fit everything, but it’s worth it.
Short stacks are stable stacks.
Using Cheap Shelf Liners
Not all shelf liners are created equal, and I learned this expensive lesson. I initially bought smooth, thin plastic liners from a discount store, thinking any liner would work.
Those smooth liners were actually worse than nothing because they created an even more slippery surface.
I wasted money twice before finally investing in quality textured liners from Duck Brand. The difference was immediately obvious. Real grip matters.
Don’t cheap out on this foundation piece.
Ignoring the Pre-Trip Check
The one time I was running late and skipped my cabinet check, I deeply regretted it. About an hour into the drive, I heard a crash from the kitchen.
When I stopped to investigate, I found that a tension rod had loosened and was no longer holding my plates securely. Two plates broke before I caught the problem.
That five-minute check prevents hours of cleanup and replacement costs. I never skip it anymore, no matter how rushed I am.
Weak Cabinet Latches
For the first year, I trusted the standard RV cabinet latches completely. They kept the doors closed, so I assumed everything inside was secure. Wrong.
Those latches prevent the doors from swinging open, but they do nothing to stop items from shifting inside or to reinforce the door against flexing.
After adding barrel bolts as secondary locks, I realized how much the cabinet doors were actually flexing during travel.
The barrel bolts eliminated that flex, which eliminated the subtle movements that were causing my problems. Upgrade those latches.
Wrong Dish Material for My Storage
I fell in love with a beautiful set of heavy ceramic dishes at a store and bought them without thinking about how I’d secure them during travel.
Those dishes were gorgeous, but they were completely wrong for my RV setup. They were too heavy for my shelves, didn’t stack well, and broke despite my best efforts.
I eventually admitted defeat and switched to lighter, RV-appropriate dishes. The lesson: your securing capability should match your dish choice, or vice versa.
If you’re still choosing dishes, make sure they’re designed for travel.
Forgetting About Counter Items
For months, I focused obsessively on securing cabinet contents while completely ignoring the decorative bowl and small plant sitting on my counter.
During one sharp turn, both items slid across the counter and crashed to the floor.
Now I know: how to secure items to a counter in an RV is just as important as securing cabinet contents. Everything needs putty, non-slip mats, or storage. Never leave anything loose ever.
Quick FAQs: Your Top Questions Answered
What is the single best way to keep dishes from sliding in an RV?
Non-slip shelf liners combined with tension rods give you about 80% of the benefit.
I’ve tested every method over the years, and this combination delivers the most value for your time and effort.
No single solution works perfectly alone, but these two together create a foundation that actually functions.
Start here, then add other solutions as needed based on your results.
How do I keep dishes from breaking in an RV during travel?
Three steps made all the difference for me: reduce stack height to four or five plates maximum, add foam padding between fragile items, and use vertical storage whenever possible.
Breaking happens from impact, so your goal is to minimize contact points between dishes. When dishes can’t touch each other or slam into cabinet walls, they can’t break.
It sounds simple, but implementing these three rules cut my breakage rate to nearly zero.
Do non-slip shelf liners really work?
Yes, but only quality ones with aggressive texture. I wasted money on cheap smooth liners that were completely useless. They actually made things worse by creating an even slicker surface.
Brands like Duck Brand, Gorilla Grip, and Con-Tact make liners with real grip that genuinely hold dishes in place.
The difference between cheap and quality liners is dramatic. Don’t make my mistake of trying to save a few dollars on this foundation piece.
How do you store cups in an RV?
I either nest cups inside each other if they’re the same size, or I store them upside down with a small folded towel underneath for cushioning.
Never store cups loose and standing upright; they will tip over and break. I learned this after breaking three coffee mugs in my first month.
Nested cups are remarkably stable because they act as a single unit rather than individual tippy objects.
I can nest three cups deep before stability becomes an issue.
What’s the best way to secure glassware in RV cabinets?
Vertical plate cradles with foam padding between pieces changed everything for my glassware and glass dishes.
Glass needs both physical barriers to prevent tipping and cushioning to absorb vibration impacts.
I place foam sheets between my Corelle plates and store them vertically in cradles. This combination addresses both the fragility and stability issues that glass presents.
Since implementing this system, I haven’t chipped or broken a single piece of my Corelle collection.
How do I keep things from falling out of RV cabinets when I open them?
Install barrel bolts or child-proof locks as secondary security on your cabinet doors, and position a tension rod just behind the door to catch anything that tries to shift forward.
I learned this lesson painfully after a bowl fell on my foot when I opened a cabinet.
The tension rod creates a physical barrier right at the door opening, so even if items have shifted during travel, they can’t tumble out when you open the door.
This simple addition eliminated my fear of opening cabinets after a long drive.
Should I pack dishes differently in a motorhome versus a travel trailer?
Motorhomes experience more constant vibration while you’re actively driving, so you need extra securing—especially tension rods and foam padding.
Travel trailers experience more swaying and lateral movement since they’re being towed.
Both need the same foundation of quality liners and proper stacking, but I’d prioritize multiple tension rods in motorhomes and more side-to-side securing (like dividers) in trailers.
That said, the differences are subtle. A good comprehensive system works for both.
Conclusion and Next Steps
You now have everything I’ve learned over years of trial, error, and, unfortunately, broken dishes.
The solutions range from simple shelf liners you can install today to advanced cabinet modifications for serious travelers.
The key insight I want you to take away is this: layering multiple methods together creates a more secure system that’s greater than the sum of its parts.
My recommendation is to start with the foundation quality textured liners, proper stacking techniques, and filling every gap with soft items.
Take a test drive around your area and identify which cabinets still have problems.
Then add intermediate solutions like tension rods and vertical storage to address those specific problem areas. Keep adjusting your system until nothing moves during travel.
For more comprehensive RV kitchen organization strategies beyond just securing dishes, check out our detailed guide on rv dinnerware storage for cabinet layout ideas and space optimization techniques.
Safe travels, and may your dishes stay intact for thousands of miles ahead!