You’ve just moved into your dream home, but there’s one problem: the beautiful kitchen comes with a non-kosher oven.
Or maybe you’re preparing for Pesach and need to transform your everyday kitchen into a kosher-for-Passover space. Don’t worry, you’re not alone in this challenge.
How to kasher a non kosher oven is a process that transforms your appliance from treif (non-kosher) to kosher through intense heat and proper cleaning techniques.
This ancient Jewish practice follows specific halachic laws that purify cooking surfaces, making them suitable for kosher food preparation.
Whether you need to kasher an oven without self-clean, prepare for Pesach, or convert from meat to dairy use, the process requires careful attention to temperature, timing, and technique.
The good news? With the right knowledge and tools, you can successfully kasher most ovens at home. This guide covers everything from basic kashering principles to complex kitchen conversions.
HOW TO KASHER A NON KOSHER OVEN: QUICK ANSWER
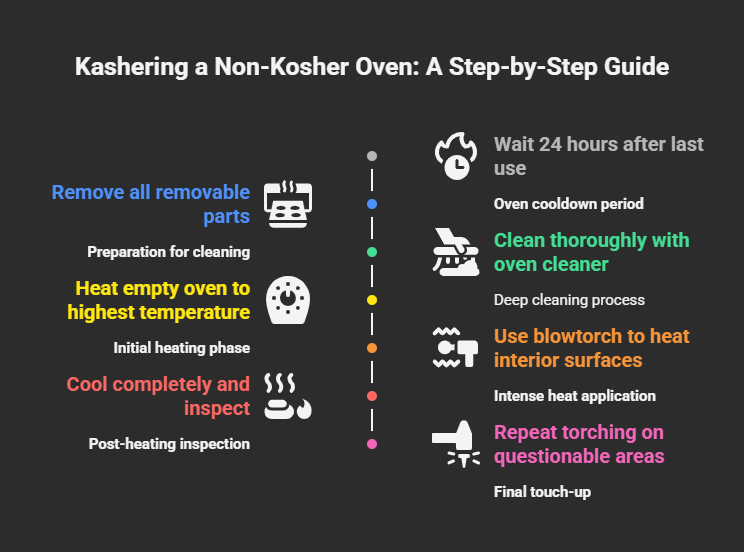
To kasher a non-kosher oven:
- Wait 24 hours after last use
- Remove all removable parts (racks, broiler pans)
- Clean thoroughly with heavy-duty oven cleaner and scrub all surfaces
- Heat the oven to the highest temperature (500°F+) for 1 hour
- Use a blowtorch to heat every interior surface until glowing red-hot (482°F/250°C)
- Work systematically – back wall, sides, bottom, then top
- Hold flame 10-15 seconds per area until the metal changes color
- Cool completely and inspect for missed spots
- Repeat torching on any questionable areas
For ovens with self-clean: Run the longest self-clean cycle, then torch any missed areas.
Time needed: 6-8 hours total. Temperature required: 482°F (250°C) minimum – metal must glow red
UNDERSTANDING KASHERING FUNDAMENTALS
What Does “Kasher” Mean?
Kashering means making something kosher through a purification process. Unlike regular cleaning, kashering removes the “taste” (ta’am) that non-kosher foods leave behind in cooking surfaces.
The process follows the principle “k’bolo kach polto” – the way it absorbs is the way it releases. Since ovens absorb flavors through dry heat, they must be purified using the same method.
Think of it like this: when you cook bacon in a pan, the pan “remembers” that flavor. Kashering erases that memory.
Types of Ovens and Kashering Compatibility
Not all ovens can be kashered successfully. Here’s what you need to know:
Conventional ovens are the easiest to kasher. They have simple interiors without complex parts that trap grease.
Convection ovens require extra attention to the fan housing and vents. These areas can harbor residue that’s hard to reach.
Gas ovens need special care around burner elements and gas lines. Never use water near gas connections during cleaning.
Electric ovens heat more evenly, making the kashering process more predictable.
Very old ovens (over 20 years) might have worn surfaces that can’t be properly kashered. The metal may be too degraded to handle the process.
PRE-KASHERING ASSESSMENT AND PREPARATION
Determining If Your Oven Can Be Kashered
Before you start, inspect your oven carefully. Look for these warning signs:
Heavy rust or corrosion means the oven can’t be kashered. The damaged metal won’t heat properly.
Excessive grease buildup that won’t come off after thorough cleaning is another red flag. If Easy-Off or ammonia-based cleaners can’t remove it, kashering won’t work either.
Missing or damaged interior panels create hiding spots for non-kosher residue. These must be replaced first.
When in doubt, consult your rabbi. They can help determine if your specific oven meets kashering standards.
Essential Tools and Supplies
Gathering the right equipment is crucial for success. Here’s your shopping list:
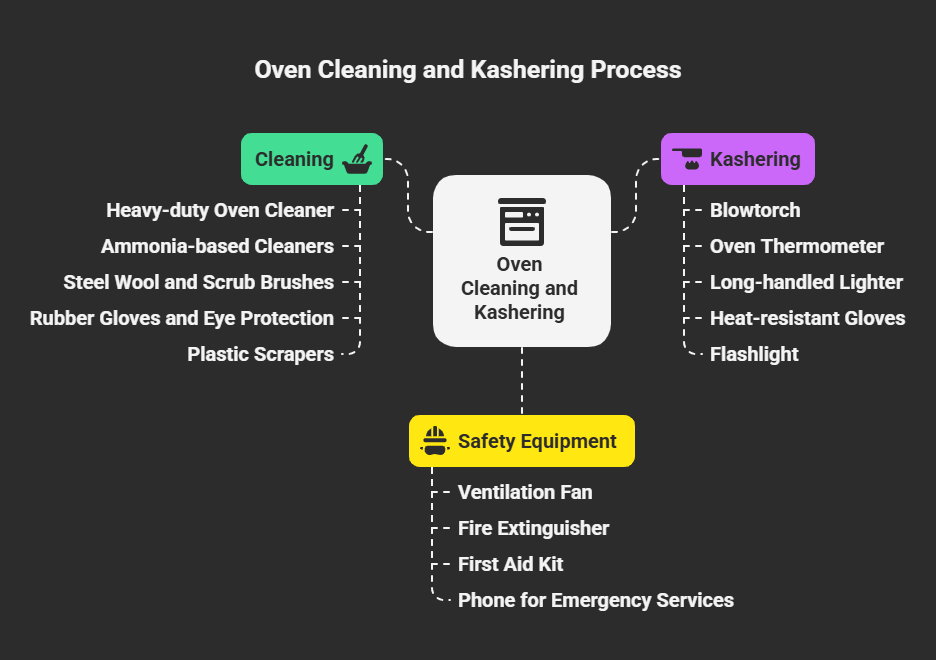
For cleaning:
- Heavy-duty oven cleaner (Easy-Off works well)
- Ammonia-based cleaners for stubborn spots
- Steel wool and scrub brushes
- Rubber gloves and eye protection
- Plastic scrapers for removing buildup
For kashering:
- Blowtorch with adjustable flame
- Oven thermometer (must read up to 500°F)
- Long-handled lighter
- Heat-resistant gloves
- Flashlight for dark corners
Safety equipment:
- Ventilation fan or open windows
- Fire extinguisher nearby
- First aid kit
- Phone to call emergency services if needed
Safety Preparations
Safety comes first in any kashering project. Start by ensuring proper ventilation. Open all windows and turn on exhaust fans.
Clear the area around your oven. Remove curtains, paper towels, and anything flammable within six feet.
Check your smoke detectors. You might want to temporarily disable the one nearest your kitchen (but remember to turn it back on).
Have a fire extinguisher ready. Know how to use it before you start.
Consider hiring professionals for complex jobs or if you’re uncomfortable with blowtorches.
THE COMPLETE KASHERING PROCESS
How to Kasher an Oven Without Self-Clean Function
This is the most common scenario homeowners face. Here’s the step-by-step process:
Step 1: Wait 24 hours Don’t use the oven for a full day before cleaning. This allows absorbed flavors to “settle.”
Step 2: Remove everything possible. Take out racks, broiler pans, and any removable parts. These need separate treatment.
Step 3: Clean thoroughly. Apply heavy-duty oven cleaner according to package directions. Let it work for the full recommended time.
Scrub every surface with steel wool. Pay special attention to corners and crevices where grease hides.
Use ammonia-based cleaners for stubborn spots. The goal is to remove every trace of buildup.
Step 4: Heat the empty oven. Set your oven to its highest temperature (usually 500-550°F). Let it run for one hour.
This step prepares the metal for kashering by burning off any remaining residue.
Step 5: Begin blowtorching. Working systematically, torch every interior surface until it glows red-hot. This typically means reaching 482°F (250°C) or higher.
Start with the back wall, then move to the sides, bottom, and finally the top. Don’t rush this step.
Each area needs sustained heat for 10-15 seconds. You’ll see the metal change color when it’s hot enough.
Step 6: Cool and inspect. Let the oven cool completely. Check for any missed spots or areas that didn’t get hot enough.
Repeat the torching process on any questionable areas.
KASHERING OVENS WITH SELF-CLEAN FUNCTION
If your oven has a self-clean cycle, you’re in luck. This feature makes kashering much easier.
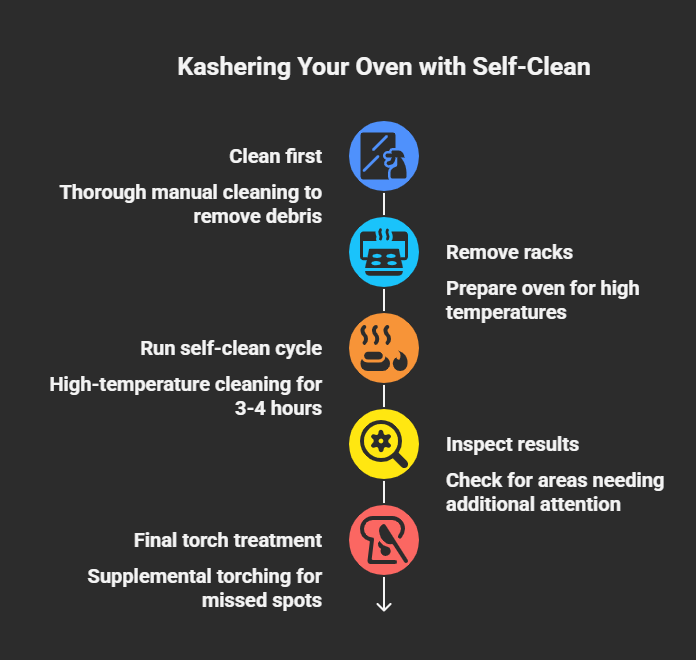
Step 1: Clean first. Even with self-cleaning, start with thorough manual cleaning. Remove loose debris and heavy buildup.
Step 2: Remove racks. Most racks can’t handle self-clean temperatures. Remove them for separate kashering.
Step 3: Run self-clean cycle. Use the longest self-clean setting available (usually 3-4 hours). This reaches temperatures of 800-900°F.
Step 4: Inspect results. After cooling, check if any areas need additional attention. Sometimes, corners or door frames need supplemental torching.
Step 5: Final torch treatment. Use your blowtorch on any spots the self-clean cycle missed. Focus on door seals and hard-to-reach corners.
Kashering Oven Racks and Removable Parts
Racks need special attention because they’re harder to heat evenly.
Method 1: Boiling (for smaller racks). If your racks fit in a large pot, you can kasher them by boiling for 30 minutes. Add kosher salt to raise the boiling temperature.
Method 2: Torch method (for larger racks) Place racks on a heat-resistant surface outdoors. Torch each wire until red-hot.
Work systematically across each rack. Don’t miss any spots.
Method 3: Professional service. Some people prefer having racks professionally kashered. This ensures complete coverage and reduces safety risks.
SPECIALIZED KASHERING SCENARIOS
How to Kasher an Oven for Pesach
Pesach kashering has additional requirements beyond standard kashering.
Chametz removal is critical. Even tiny crumbs can make food non-kosher for Passover. This means extra-thorough cleaning before kashering.
Start your Pesach preparations early. The kashering process takes time, and you’ll need your oven ready before the holiday.
Pay special attention to these areas:
- Door hinges where crumbs collect
- Vent openings that might harbor particles
- Control knobs and handles
- The space between the door and the frame
Some rabbis require covering certain surfaces even after kashering for Pesach. Check with your religious authority about local customs.
Consider whether items like kosher glassware need special Pesach preparation alongside your oven work.
Kashering an Oven from Meat to Dairy
Converting a meat oven to dairy use requires careful planning.
Wait 24 hours after the last meat use before beginning the process. This allows absorbed meat flavors to settle.
Clean more thoroughly than usual. Meat leaves stronger flavors than other foods, so extra scrubbing is essential.
Some communities require waiting periods between kashering and first dairy use. Your rabbi can advise on local customs.
Label your oven clearly after conversion. Use permanent markers or tags to avoid confusion later.
Consider whether your kosher dinnerware needs a similar meat-to-dairy conversion.
How to Kasher Stovetops for Pesach
Stovetop kashering varies by type but follows similar principles.
Gas stovetops:
Remove all grates and drip pans for separate cleaning.
Turn each burner to high heat for 15 minutes. The flames will kasher the burner heads.
Torch the stovetop surface around each burner until hot.
Clean control knobs thoroughly with ammonia-based cleaners.
Electric stovetops:
Turn the coil elements to high heat for 15 minutes. They’ll glow red when properly heated.
For glass-top ranges, use the blowtorch method since the surface can’t be removed.
Clean around elements where spills collect.
Both types need attention to:
- Backsplash areas where grease splatters
- The space between the stovetop and the wall
- Range hood filters and surfaces.
COMPLETE KITCHEN KASHERING INTEGRATION
How to Kasher a Non-Kosher Kitchen
Converting an entire kitchen requires systematic planning.
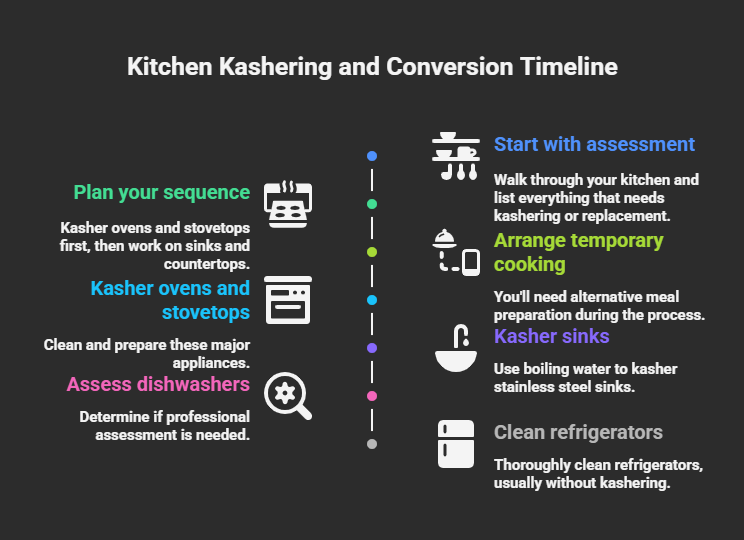
Start with an assessment. Walk through your kitchen and list everything that needs kashering or replacement.
Plan your sequence. Kasher ovens and stovetops first, then work on sinks and countertops.
Arrange temporary cooking. You’ll need alternative meal preparation during the process.
Consider these major components:
Ovens and stovetops (covered above)
Sinks: Stainless steel can be kashered with boiling water. Pour continuously over all surfaces for 30 seconds.
Countertops: Stone surfaces can often be kashered. Laminate usually cannot.
Dishwashers: These typically need professional assessment.
Refrigerators: Usually just need thorough cleaning, not kashering.
How to Kasher a Kitchen Completely
Week 1: Planning and shopping
- List all equipment that needs work
- Buy cleaning supplies and tools
- Arrange alternative cooking methods
- Schedule time off work if needed
Week 2: Major appliances
- Kasher ovens using the methods above
- Work on stovetops and ranges
- Handle any professional services
Week 3: Surfaces and finishing
- Address countertops and sinks
- Handle smaller appliances
- Install any new equipment
Week 4: Organization and testing
- Set up kosher storage systems
- Test all kashered equipment
- Stock up on kosher supplies
Remember that some items, like bone china dishes may not be suitable for kosher kitchens depending on your religious standards.
TROUBLESHOOTING AND COMMON ISSUES
What to Do If Kashering Fails
Sometimes kashering doesn’t work as planned. Here are warning signs:
Persistent odors after cooling suggest incomplete heat treatment. You’ll need to repeat the process.
Visible residue remaining means your cleaning wasn’t thorough enough. Start over with better cleaning products.
Uneven heating patterns indicate your technique needs improvement. Work more slowly and systematically.
Equipment failure, like broken thermometers or inadequate torches, will compromise results.
When kashering fails, don’t just ignore it. Consult your rabbi about next steps.
Emergency Kashering Procedures
Sometimes you need fast results for unexpected situations.
Last-minute holiday preparations might require abbreviated cleaning cycles, but never skip the heat treatment.
Focus on essential areas if time is short. The main cooking chamber matters more than cosmetic areas.
Get rabbinical guidance for emergencies. Some shortcuts might be acceptable temporarily.
Plan better next time. Emergency kashering is stressful and less reliable than planned procedures.
Maintenance After Kashering
Keep your newly kashered oven kosher with proper maintenance.
Clean spills immediately before they bake on and require re-kashering.
Use kosher-only cookware in your kashered oven. Even kosher food cooked in treif pans can contaminate the space.
Consider your Corelle dinnerware status and whether it meets your kosher standards for oven use.
Schedule annual deep cleaning to prevent buildup that might require re-kashering.
PROFESSIONAL SERVICES AND ALTERNATIVES
When to Hire Professional Kashering Services:
Some situations require expert help:
Complex commercial equipment has too many components for DIY kashering.
Safety concerns about using blowtorches in your home.
Physical limitations that prevent thorough cleaning or careful torch work.
High-value ovens where mistakes could be costly.
Time constraints when you can’t dedicate days to the project.
Professional services typically cost $200-500 per oven, depending on complexity.
Alternatives to Kashering
Sometimes replacement makes more sense than kashering:
Very old ovens (over 15 years) might not be worth the effort.
Heavily damaged units with rust or missing parts.
Built-in ovens where kashering access is limited.
When professional costs approach new appliance prices.
Consider whether investing in new equipment gives you features like better temperature control or energy efficiency.
FAQ SECTION
Plan on 6-8 hours total: 2 hours cleaning, 1 hour initial heating, 2-3 hours systematic torching, plus cooling time.
Ovens over 20 years old often have worn surfaces that won’t kasher properly. Have a rabbi inspect it first.
If you’re certain it’s never been used for treif, it might only need thorough cleaning rather than full kashering.
For expensive or complex ovens, professional service provides peace of mind and warranty protection.
Kashering can be done anytime, but many people coordinate with holiday preparations for convenience.
The metal must reach at least 482°F (250°C) and glow visibly red-hot.
Proper kashering leaves the oven interior looking clean with no residue, odors, or missed spots.
CONCLUSION AND NEXT STEPS
Kashering a non-kosher oven requires patience, proper tools, and attention to detail. The process transforms your kitchen into a space suitable for kosher cooking while following ancient religious traditions.
Remember these key points: thorough cleaning comes before heat treatment, safety equipment is essential, and a systematic technique ensures complete coverage.
Whether you’re preparing for Pesach or converting your entire kitchen, the same principles apply.
When in doubt, consult your rabbi for guidance on local customs and standards. They can help determine if your specific situation requires additional steps or professional services.
Your newly kashered oven opens up possibilities for kosher cooking and holiday preparations. Combined with proper kosher china and cookware, you’ll have everything needed for a fully functional kosher kitchen.
Take pride in maintaining these important traditions while creating a space where your family can enjoy kosher meals year-round.